As 2021 has now come to a close, we would like to take the opportunity to provide you with an overview of some of the key new features that were recently released during the final quarter of 2021.
As an organisation, we would like to thank all of those who have provided feedback and suggestions for new features. We have and continue to take into account our clients ideas, in addition to our pool of thoughts internally. Overall, we’re making sure everything you need is all in one place.
1. New Features
1.1 Resource Booking
Activate the Resource Booking module from Config > Asset Management. This will open up a new tab on the Asset Type details screen for resource booking, which will allow you to activate resource booking for an Asset type and contains all settings relevant to resource booking.
Resource booking hours will allow you to choose a workday set for which booking is allowed based on working days, hours and holidays. Booking types define the duration of a booking and are used to determine the available timeslots within the working hours. These can be set as follows:
- A fixed number of minutes (e.g 60 minutes). This will make the timeslots available every hour within the working hours.
- A fixed number of days (e.g 1 day). This will make it so you only select a start date of the booking instead of a particular time slot.
- Custom timeslots. These allow you to specify the slots you want to be available within the working hours and these can be spaced however and at different intervals.
There are also settings that determine which assets will be available based on client and site, whether to auto-allocate an asset or allow selection, and the minimum hours in advance to allow booking and maximum days in advance to allow booking.
Resource booking itself is done via the new ticket screen on the end-user portal or agent application. In order to use this, a “Resource Type” must first be chosen. This links to the Asset types for which resource booking is enabled. A default can be picked at either Template or Ticket Type level, or you can add the Resource Type field to the Ticket type field list in order to select it on the new ticket form.
Add the “Resource Booking” field to your ticket type in order to show the booking fields on the new ticket screen.
You can now also toggle Calendar view when viewing Assets tickets so you can easily see the bookings for a particular asset on a Calendar. A few other minor improvements have been made involving being able to see start/target date/times on the end-user portal, calendar view, and resolving a few related issues.
1.2 Knowledge Base Draft Functionality
Enable “Use article drafts” in Config > Knowledge Base. This will make it so agents can no longer directly add a new knowledge base article or edit the details of existing articles and instead need to create a draft version of the article and publish it.
Draft articles use ticketing functionality. In order to utilise this, a ticket type should be created for Draft Articles and set as the “Ticket Type for Article drafts” in Config > Knowledge Base.
Knowledge Base article fields have been added to the Ticket Type and Action field lists. These should be included in your draft ticket type. The new fields include:
- Article type (for when also using the news articles functionality)
- Article description
- Article resolution
- Article notes
- Tags
- FAQ lists
- Related Articles
When using drafts, agents will no longer be able to edit the details of existing articles and will instead need to use the “Draft Amendment” button. This will open the New Ticket screen with the Draft article ticket type with all the article fields populated with the data from the existing article. When using the Publish article action for Drafts on existing articles, the article will be updated, or if you are also using the article versioning functionality a new version of the article will be created. This functionality allows you to have a more comprehensive process for new articles or updates to existing articles, including approval processes. A new approval type for Linked Article Owner has also been added to allow approvals on amendments to existing articles to be approved by the owner of the article, as well as an approval rule criteria option for Linked Article ID.
1.3 Satisfaction Surveys on Self-Service Portal
Satisfaction Surveys allow you to capture more information from your users regarding their experience compared to One Click Feedback. These Surveys can be configured in Tickets > Surveys towards the bottom of the page.
The $SATISFACTION variables have been modified and will now take your users to the Survey page. You can still use user closure confirmation with these Surveys. The percentage chance of a user being surveyed is configured at the top of the page.
By default, the survey will contain a satisfaction level with the lookup mappings which you can configure by clicking the “Survey Satisfaction level mappings” button. It will also contain a general comments field, similar to how One Click Feedback allows you to collect comments. These two fields will be saved to the feedback table in the same format to how One Click Feedback is saved.
You now have the ability to add custom survey fields by clicking on the “Add Survey Custom Fields” button. Once you have created the field, you must remember to add it to the Ticket Type you wish to collect the data on. When a user submits the Survey, the data collected will be saved against the ticket in the faults table – ready for you to report on.
1.4 Optional Services
Optional Services provide a new way of logging child Service Requests from a Service. Using this functionality, you can show the new ticket forms of other child service requests from the parent and log requests for service items at the same time as the parent service request.
In the Service Config, if the Service is set to show the new ticket form when logging the Service Request, there is now a table for optional service items. Here, you can specify all the Service Items that you wish to be possible child requests of the Service Request. They can be set to be included by default and made mandatory.
When logging a Service Request on the portal for a service with optional Services, the New Ticket form will now have a ‘Choose Options’ tab. Once you complete the details form for the Service Request the user will be taken to the ‘Choose Options’ tab. There, they can choose which optional Services they would like and if there is a form for the service, the form can be completed there.
Enabled optional Services will submit a new Service Request as a child of the original Service Request. These will obey copy to child field functionality and be for the same user as the parent. A good use case is logging a New Starter service request, and being able to choose the equipment they require. This method provides a simpler way to using child creation rules and having all the fields on the parent Service Request.
1.5 Project Management Enhancements
Projects View
Enable the “Enable the project view in the tree” setting in Config > Project Management (and the same setting at Ticket Area level if active). This will open up a new view type in the left tree menu called “Projects”. The projects view is different to other views in that it lists the project tickets based on the current filter profile in the tree menu instead of having the usual list of tickets. The counts will show the number of open Child Tasks on the project. Selecting a project from the menu will open the ticket details screen for the project. This allows you to more easily navigate between projects from the left menu.
New List Views
Previously you could toggle between the Table view and List view on the Tickets list. 3 new options have been introduced:
- Calendar view – shows a calendar with tickets based on their start and target date fields.
- Kanban view – shows a column for each status with tickets sorted into the relevant column.
- Gantt view – shows a timeline with tickets based on their start and target date fields.
Calendar and Kanban view were previously available as list view type overrides in My Lists, but are now available to switch to for any tickets lists. Each of these views is also available on the Child Tickets/Related Tickets tabs. These can be made the default view at the Ticket area level, or at My List level.
Gantt Chart
A Gannt chart is now an available view for tickets and the child tickets tab as detailed above. The Gantt view shows a timeline with a row for each ticket. The tickets show and are ordered based on their start date/time and target date/time fields, and will only show if these are populated. There is also an option to toggle the display to an Agent Gantt from the … menu. This shows a line per Agent instead of a line per ticket/task, and groups tasks for the same agent together.
New Ticket Type settings
A couple of new Ticket Type level settings have been added to improve project management. This can be found within the Details > Settings.
- Default list type for child tickets – allows you to choose either Table, Tile, Calendar, Kanban or Gantt view as the default on the Child tickets tab
- Initial Ticket Details tab – allows you to set the first tab on the ticket details screen to be the Child Tickets tab.
1.6 Push Notifications (Mobile App)
On the Notification settings screen you can now enable push notification to be sent to iOS and Android devices by enabling the “Send a push notification” setting.
When a notification is created, it will then deliver the push notification via APNS or Firebase depending on your device.
In order to receive a push notification, you must have the Halo iOS/Android application installed and have allowed push notifications, and have opened the app in the last 30 days.
1.7 Agent Appointments
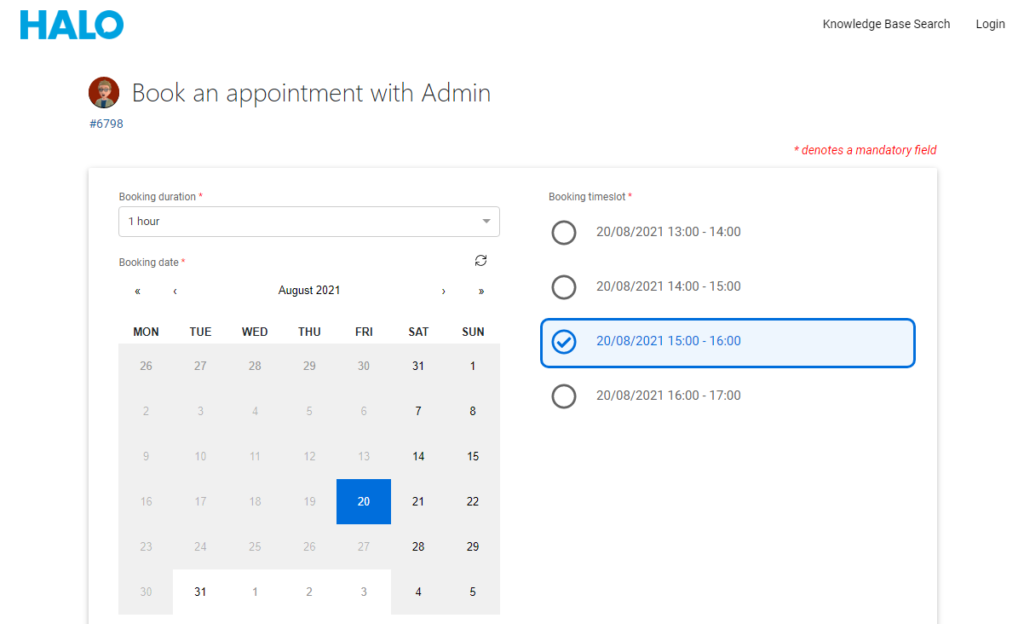
End-users can now book appointments with the assigned agent of the ticket via the end-user portal. This can be configured via the Resource Booking module in Config > Calendar > Resource Booking.
A new config section has been added for Agent appointment booking. This feature works similarly to the Asset Resource booking feature that was recently added, with a similar configuration and the same booking form.
For agent appointment booking, $-AppointmentBooking should be added to an email template that is used on an action on a ticket. The Agent will then send an email to the user with a link to book an appointment with the assigned agent on the ticket. This link goes to the portal and can be used whilst not authenticated or while authenticated. It will show the user the available timeslots to book an appointment with the agent. Selecting a timeslot and completing the form will create an appointment for the agent with the user as an attendee and be linked to the ticket.
1.8 Agent @mentions
Enable “Allow Agents to be Mentioned in action notes” from Config >Notifications > Settings. This will allow you to type “@Agents Name” in an action note or email to tag the agent in the action. This can also be used on the agent new ticket screen.
A notification type has been added for “Mention”. When configured, mentioning an agent on an action will then send them a notification. Requires NHServer version 13.33+ to deliver the notifications.
1.9 You can now merge and link incidents
You can now merge and link tickets by dragging and dropping them onto each other. This can either be done with a single ticket without selection or by selecting multiple tickets and dragging from one of them. It will open a screen, where you can confirm whether to merge or link and what tickets are being merged into what ticket.
1.10 Keyboard Shortcuts
You can view the new shortcuts from Help > Keyboard shortcuts or by pressing ? on your keyboard.
1.11 The Change Calendar can now be published on the Self-Service Portal
Enable the “Publish the change calendar to the Self-Service Portal” setting in Config > Tickets > Change Management. This will allow you to add a new button called “Change Calendar” to the Self-Service portal. The Change Calendar on the portal will show all Change Requests and there summary and details on hover.
A setting has also been added at custom field level called “Filterable on the Calendar screen”. This allows Agents to filter the Change/Project Calendar by a custom field value. This option is only available for drop-down fields, and the custom field filters will show in the Filters section of the left-hand menu.
1.12 You can now add the viewers column to ticket list
This column shows Agents who are viewing the ticket details at the time the list was loaded/refreshed. This will only show for the first 20 rows in a page for performance reasons.
1.13 Added calculated custom fields
Added calculated custom fields that calculate their value from other numerical custom fields. These custom fields can be configured by creating a ticket custom text field and setting its input type to calculated. The calculation field will then show which can be populated with the $ variables for the fields you want to use in the calculation.
Numeric text custom fields can be used as well as single selects, which will use their index value not their text display. The calculated field will update every time one of the fields in the calculation is updated.
1.14 UI update
The agent app user interface has had a refresh. Updated fonts and an improved left-hand tree menu are the main changes.
A new theme has been added called “Halo Light” (the previous theme of this name has been renamed “Halo Standard”). This is the same as the standard theme but with a lighter tree-view and left menu matching the application colour.
A new setting has been added to Config > Advanced, and Agent preferences, called “Navigation menu display”. This has 3 options to change the appearance of the left-hand navigation menu.
- Small icons (current default)
- Large icons – makes the icons larger the current ones
- Large icons with labels – makes the icons larger and adds a label underneath them.
1.15 API endpoint “/swagger” added, which shows available endpoints and operations.
2. New Integrations
3. Upcoming Developments
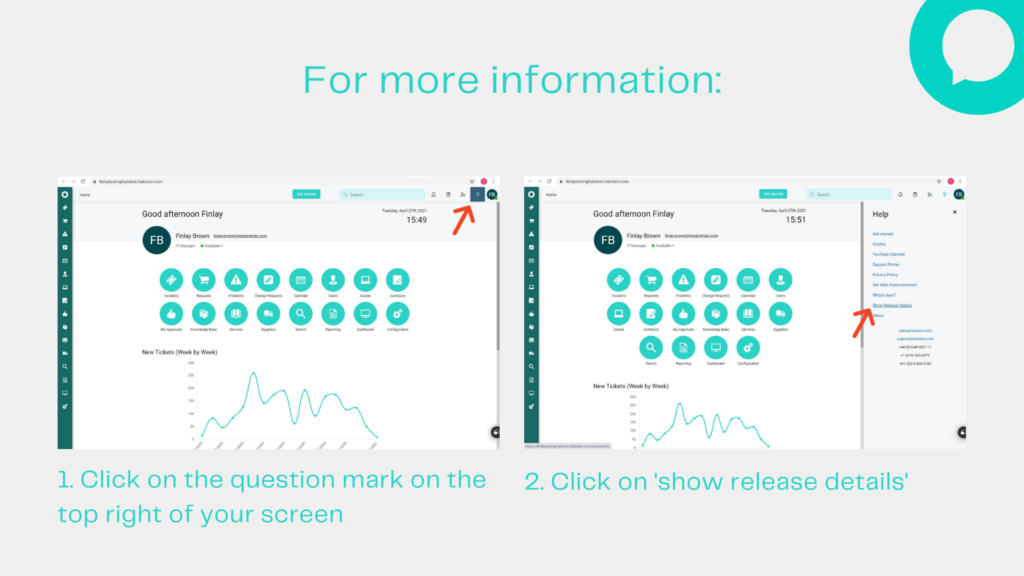
For more information:
If you would like to learn more about future developments, check out our roadmap here.
Want a more in-depth discussion of specific features, or simply have a question? Feel free to reach out to your customer success manager or Contact us, and we’ll get back to you shortly.


